If you’re bored with your old hoodie or just looking for a fresh style, why don’t you give it another life with a new look? Trust us, with many years exp in the fashion industry, “How To Cut A Hoodie Into A Crew Neck?” will be the best question for you to find an answer for your boring hoodie! Let’s check out our 5 quick steps to make your own one now!
Supplies & Materials Needed
Supplies:
- Sewing machine
- Fabric scissors
- Sewing pins
- Measuring tape
- Rotary cutter (optional)
- Serger (optional)
Materials:
- Hoodie
- Matching thread
How To Cut A Hoodie Into A Crew Neck? 5 Simple Steps You Can Try At Home
Here is the beginner guide on how to cut a hoodie into a crew neck that you should consider. Let’s check out the 5 steps below to handle your perfect task!
Step 1: Remove the Hood
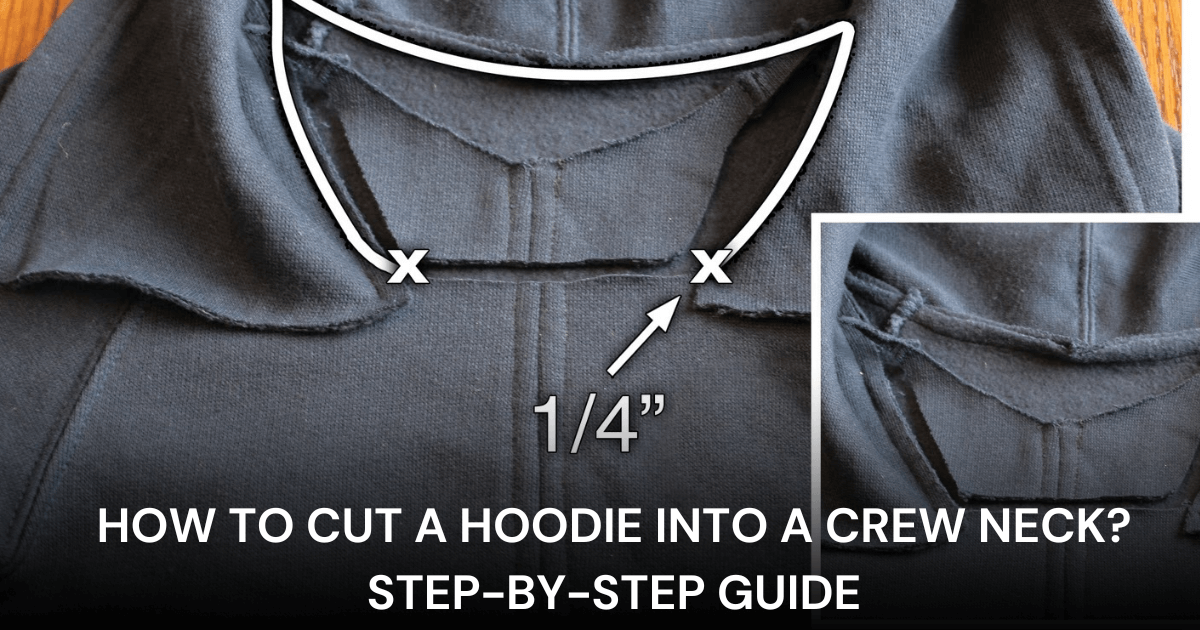
Firstly, you can start by taking a good look at how the hood connects to your hoodie. Most hoodies use a coverstitch to join the hood and body. This means you’ll see two parallel lines of stitching running along the seam where they meet.
To take off the hood, use scissors to cut along the bottom stitch line. Get as close to the stitching as you can. Try to keep your cut smooth and even for a better result. You can stop here if you like the raw edge at the neck. You don’t have to hem it unless you want a neater finish.

Remove the Hood
Step 2: Trim the Neckline
Head to step 2. You can start by slicing open the hood to make it lie flat on your work surface. The hood might have two distinct halves stitched together or be a single fabric piece, depending on the hoodie. Both options work well for this part.
Now, it’s time to cut the fabric for your neckband. Using the hood fabric, cut a strip that is 3 inches wide and 2 inches shorter than the total neckline circumference.

Trim the Neckline
Step 3: Prepare the Neckband (Pin & Sew)
Next, stitch the short edge with a 3/8-inch seam allowance. (We used a serger for this step.) After stitching, you’ll have a continuous neckband loop. Take the bottom edge of the loop and bring it up to meet the top edge.
To make sure you attach it later, split the neckband into four equal parts. First, put pins at both side folds. Then, fold the neckband again so these two pins meet in the middle, and pin the new folds to mark the other two quarters.

You should prepare the neckband perfectly – Source: Allwesew.com
Step 4: Put the Neckband On
It’s time to put the neckband on the sweatshirt. Place the neckband around the neckline, with the right sides facing each other. Line up the pins on the neckband with the matching pins on the sweatshirt, pinning them together at each quarter point.

Put the neckband on to get your ideal frame – Source: youtube.com
Step 5: Stitch the Edges for a Clean Finish
Next, we’ll do some topstitching. Pick a small stretch stitch and sew around the neckband about 1/8 inch under the seam line. When you get the stitch width a bit smaller, it’ll be less zigzaggy, giving you a cleaner look. What we’re aiming for here is to keep the seam allowance in place by stitching right through its middle.

You should stitch the edges to finish – Source: Threadmagazine.com
4 Tips and Tricks for Perfectly Cutting a Hoodie into a Crew Neck
Changing a hoodie into a trendy crew neck can give it a new vibe while keeping it comfy and laid-back. But to get a neat and professional look, you should follow the right methods. Here are four key tips to help you cut your hoodie just right.
1. Use Sharp Fabric Scissors
First off, always go for top-notch fabric scissors. You might think regular house scissors will do the trick, but they can leave rough, uneven edges that are hard to fix later. Sharp fabric scissors will give you a smooth and clean cut, making the whole process a lot easier.
2. Measure Twice, Cut Once
Second, it is important to get accurate measurements before you start the cutting process. The hoodie should be tried on so you can mark it with chalk or a fabric marker to show where the new neckline will be. When unsure about cutting dimensions, start with smaller measurements that you can adjust later.
3. Choose the Right Neckline Shape
The way the neckline is shaped will substantially affect the appearance of your crew neck hoodie. Three main neckline shapes exist: standard circular roundness for basics and, lastly, trendy V-patterns for contemporary appearances.
4. Consider Reinforcing the Neckline
Hoodie material with raw edges tends to fray over time when it comes from fabrics that easily become unraveled after cutting. Prevent raw edges from fraying by putting one row of stitches at the neckline seam or by applying fabric glue to avoid sewing altogether.
The polished finish from this trick requires you to fold the edge slightly inward while sewing a hem. This technique enhances the durability of your DIY crew neck with a sophisticated lifetime that appears like it originated from a professional manufacturer.

Common tips to handle your task – source: Simpwhispeper.com
Avoid These 4 Common Mistakes When Cutting A Hoodie Into A Crew Neck
Sewing can be a fun and rewarding hobby, but small mistakes can lead to frustration. To help you avoid unnecessary setbacks, here are four common mistakes beginners often make!
Mistake 1: Cutting Too Much Fabric at Once—Take It Slow!
Firstly, casting a wide cut in your fabric all at once stands as one of the biggest beginner mistakes possible during sewing. Cutting operates permanently since it creates damaging effects that cannot be reversed.
How to avoid it?
The key to avoiding mistakes in sewing is to proceed slowly and measure twice in small portions when required. Taking your time with patience lets you get damages free to your project so it can match what you had in mind.
Mistake 2: Using Dull Scissors – Sharp Blades Make a Difference
Second, the use of dull fabric scissors creates unnecessary difficulty during fabric cutting, although it seems minor at first. Blunt scissors produce irregular edges that furthermore have the potential to reshape delicate materials.
How to avoid it?
Try to use sharp fabric scissors because they represent the only acceptable choice when cutting materials, while regular scissors should remain isolated for household tasks.
Mistake 3: Skipping the Marking Step—Precision is Key
The marking fabric process before you cut or sew appears unnecessary at first, but inevitable errors will occur if you skip this step.
How to avoid it?
The use of tailor’s chalk, fabric pens, and ordinary pencils enables marking to confirm the correct positioning of your pieces.
Mistake 4: Not Checking the Fit Before Finalizing A Small Step That Saves Big Mistakes
There’s nothing worse than finishing a project only to realize it doesn’t fit properly!
So, same questions above: How to avoid it?
Always check the fit before making any final stitches or trims. Pin your fabric pieces together or do a quick basting stitch to test the sizing. Making small adjustments early on will save you the headache of undoing work hours later.

What are the common mistakes to consider? – Source: craftbud.com
FAQs
Will My Hoodie Fray After Cutting The Neckline ?
Yes. The process of cutting your hoodie neckline will produce fraying around the edges. To prevent fraying, you should finish raw edges by adapting many methods like zig-zag stitching, overlocking, and bias binding.
How Do I Make Sure The Neckline Is Even?
You should mark the neckline precisely before cutting because stitching along the marks ensures an even outcome. Performing this method allows you to keep your seam allowance constant.
Can I Make a V-neck Instead?
Yes, any crew neck t-shirt becomes suitable for a V-neck style through cutting and neckline adjustments. It might or might not include an additional neckband or facing application.
Final Words
In short, we cover how to cut a hoodie into a crew neck. Cutting a hoodie into a crewneck is a fun and easy way to refresh your wardrobe. You can achieve a clean look without professional tailoring by following the right steps, using the proper tools, and avoiding common mistakes. Whether you prefer a raw-edge finish for a relaxed vibe or a neatly sewn neckline for a polished touch, this DIY project is about customizing your hoodie to match your style.